Tutorial: Use Confluence to build a content collaboration space (Part Two)

This is part two of my tutorial series about how you can use Confluence to set up a space to collaborate and move new content ideas through the content creation workflow to the point where it is ready to be published.
This tutorial series is a hands-on companion to my success story about how I led a cross-functional team of experts from sales, professional services, and customer support for my product. This team worked over 2-year period to create high quality technical content that would help our team to better sell our product to our customers, deliver innovative product solutions for their environments, and encourage product adoption.
Overview
For an overview of this tutorial, see part one of the tutorial series.
What you will build in this tutorial
In part one of the tutorial series, you learned how to:
- Start a new Confluence space and add the main pages.
- Add content to the home page.
- Create a meeting notes template.
- Create a meeting page that will automatically list all of the team’s meeting notes created from the meeting notes template.
- Create an actions page that will automatically list any open action items that team’s open action items.
In this part of the tutorial series(part two), you will learn how to:
- Add content to the Team and Our Workflow pages that describes who belongs to your team and how they work to create content.
- Create a content request template to help team members or stakeholders to request new content and provide your team with the necessary information to fulfill the request.
- Add a new content request button to the content request and home pages.
- Create the Triage needed page to see all new content requests that the team needs to triage and decide whether they will work on them.
- List in progress content and other content stages so that you can easily see a list of which content is in progress or in the backlog.
- Use your Confluence space in team meetings to learn how to run a 30 minute meeting using all of the Confluence pages from this tutorial.
Before you start
Before you start, make sure you completed the steps in part one of the tutorial series.
If you skipped that tutorial, you at least need to ensure that you:
- Set up a Confluence space.
- Set up an Team section of the space that includes two sub-pages: Our workflow and Plan of record.
Add content to the Team and Our Workflow pages
In this part of the tutorial, you’ll add content to the Team and Our workflow pages that you created in part one of the tutorial series.
I recommend building the content for these two pages in collaboration with your team at your first kickoff meeting. You could possibly pre-populate the content with my suggestions, then present it to your team for discussion and buy-in. Be willing to make adjustments based on your teams suggestions based on how they decide to work together.
To add content to the Team and Our Workflow pages:
-
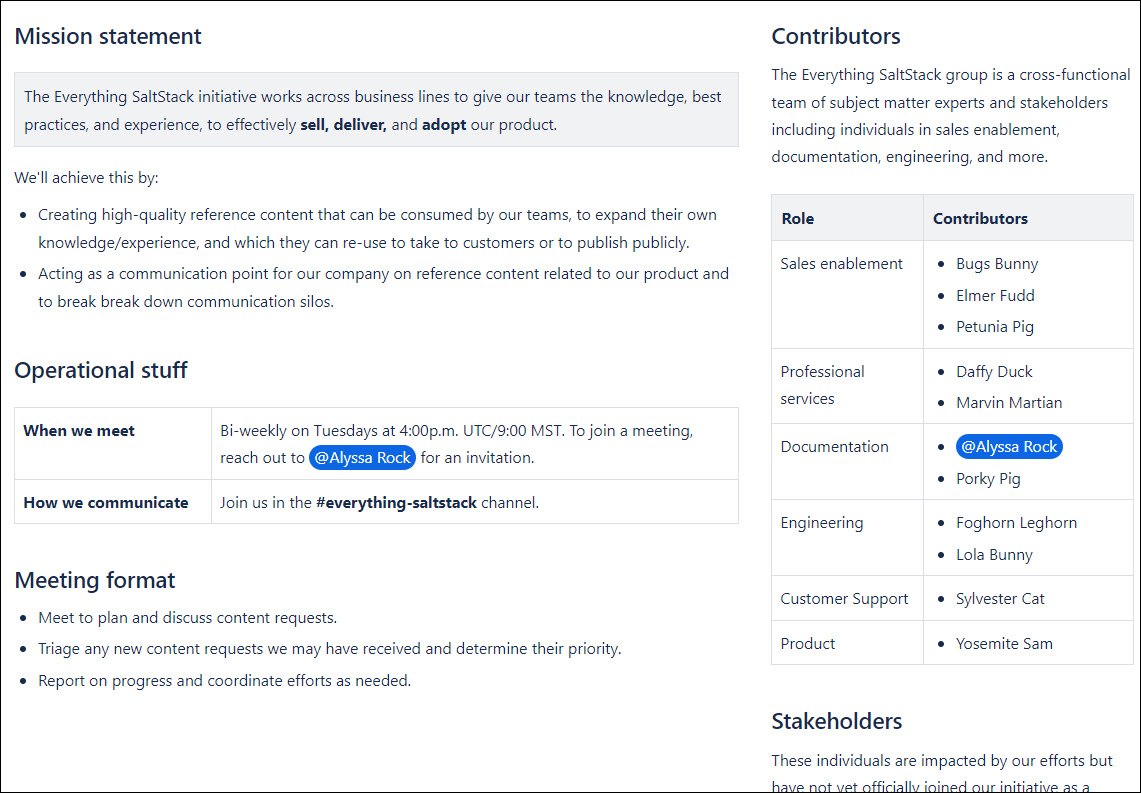
Click The Team on the side menu to navigate to that page. Edit this page to add important information about your team, such as:
- Your mission statement
- Your key objectives
- When your meetings are held
- Your Slack channel
- Your standard meeting agenda
- The key contributors to your team and their roles
- Any stakeholders
For example:
-
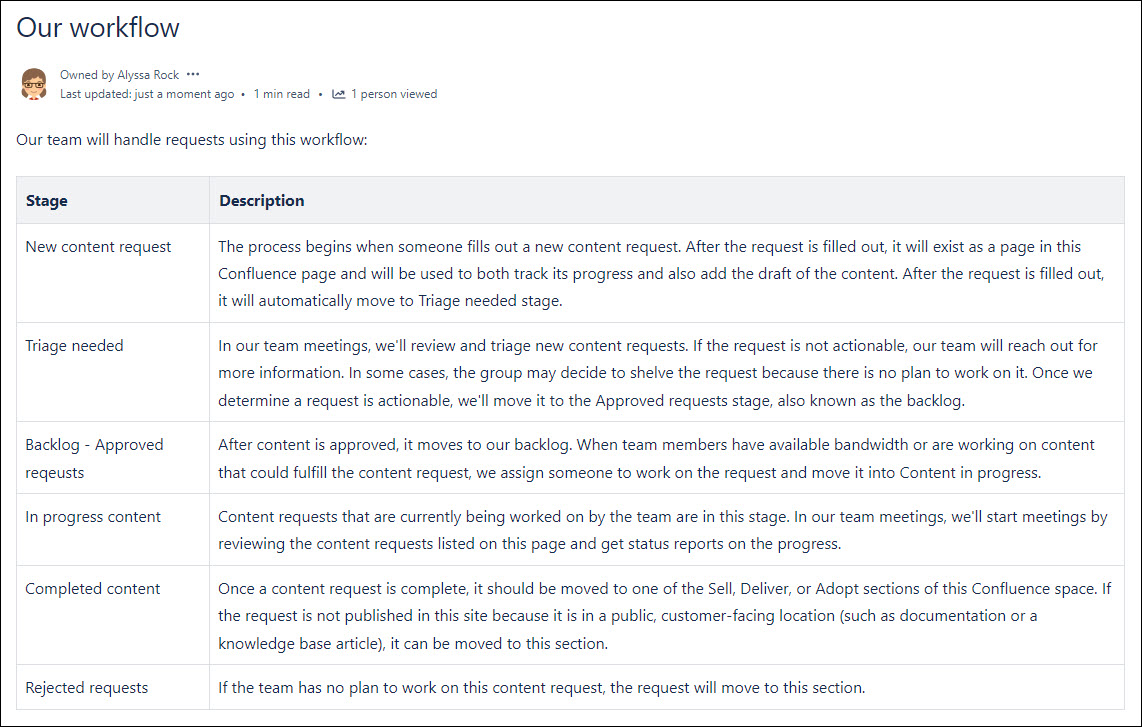
Click Our workflow on the side menu to navigate to that page. Edit this page to add table describing the different stages your content will go through from beginning to end. If you want to use my team’s workflow, the content would be:
| Stage | Description |
|---|---|
| New content request | The process begins when someone fills out a new content request. After the request is filled out, it will exist as a page in this Confluence page and will be used to both track its progress and also draft the content. After the request is filled out, it will automatically move to the Triage needed stage. |
| Triage needed | In our team meetings, we'll review and triage new content requests. If the request is not actionable, our team will reach out for more information. In some cases, the group may decide to shelve the request because there is no plan to work on it. Once we determine a request is actionable, we'll move it to the Approved requests stage, also known as the backlog. |
| Backlog - Approved requests | After content is approved, it moves to our backlog. When team members have available bandwidth or are working on content that could fulfill the content request, we assign someone to work on the request and move it into In progress content. |
| In progress content | Content requests that are currently being worked on by the team are in this stage. In our team meetings, we'll start meetings by reviewing the content requests listed on this page and get status reports on the progress. |
| Completed content | Once a content request is complete, it should be moved to one of the Sell, Deliver, or Adopt sections of this Confluence space. If the request is not published in this space because it is in a public, customer-facing location (such as documentation or a knowledge base article), it can be moved to the Completed content section. |
| Rejected requests | If the team has no plan to work on this content request, the request will move to this section. |
For example:
-
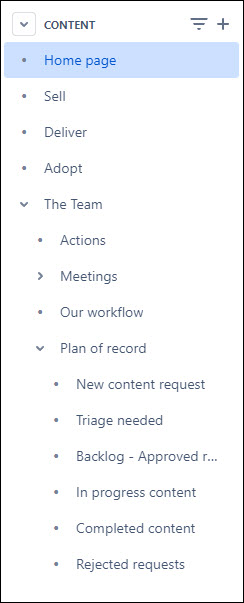
On the side menu next to Plan of record, click the Create button to create a new sub-page. Create these sub-pages to match your content workflow (or use the workflow your team agreed upon):
- New content request
- Triage needed
- Backlog - Approved requests
- In progress content
- Completed content
- Rejected requests
After completing these steps, your side menu will look similar to this example:
Create a content request template
Next, you’ll create a template for new content requests. These pages are the building blocks of the content workflow system. You can think of them as being similar to a GitHub or GitLab issue that moves through a kanban board. The main difference is that the content request page is the also where you create a draft of the content.
To create a content request template:
-
Select Space settings from the sidebar.
-
Under the Look and feel card, click Templates.
-
Click Create New Template.
-
For the title, type
Content request. -
Click the
...on the editor menu (close to the Save button) and select Add labels. Add a newtriage-neededlabel. -
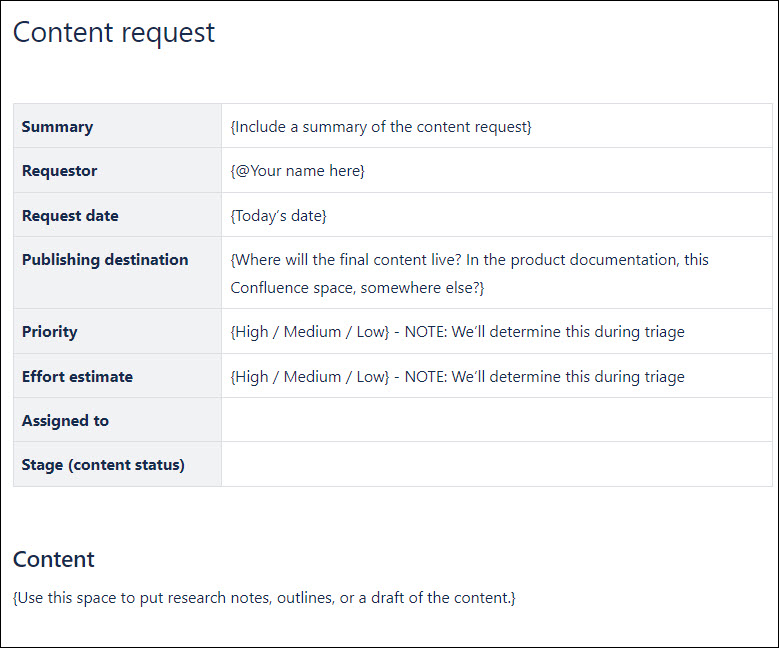
In the body of the template, add a two-column table where the content requestor can fill in the information about the content request:
| Summary | {Include a summary of the content request} |
|---|---|
| Requestor | {@Your name here} |
| Request date | {Today’s date} |
| Publishing destination | {Where will the final content live? In the product documentation, this Confluence space, somewhere else?} |
| Priority | {High / Medium / Low} - NOTE: We’ll determine this during triage |
| Effort estimate | {High / Medium / Low} - NOTE: We’ll determine this during triage |
| Assigned to | Stage (content status) |
-
Below the table, add a level 2 heading called
Content. -
Under the heading, type this text:
{Use this space to put research notes, outlines, or a draft of the content.}
After completing these steps, your content request template will look similar to this one:
Add a new content request button
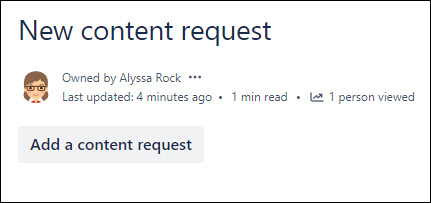
Next, you’ll create a new content request button that you’ll insert on the New content request page and the Home page:
-
Click new content request on the side menu to navigate to that page. Edit this page.
-
Add the Create from template macro:
- Click Insert elements
 on the edit toolbar to open the macro search. Search for the
 Create from templatemacro. See Create from template macro for more information. - Use these macro settings:
| Setting | Value |
|---|---|
| Button text | Type Add a content request |
| Template name | Select your custom content request template from the menu. |
| Title of page to be created | Type {Add the title of the content request} |
| Space key | Leave the current settings, which will create the meeting notes in the current space. |
- Repeat the previous step to add an identical button on the Home page.
After completing these steps, your New content request page will look similar to this example:
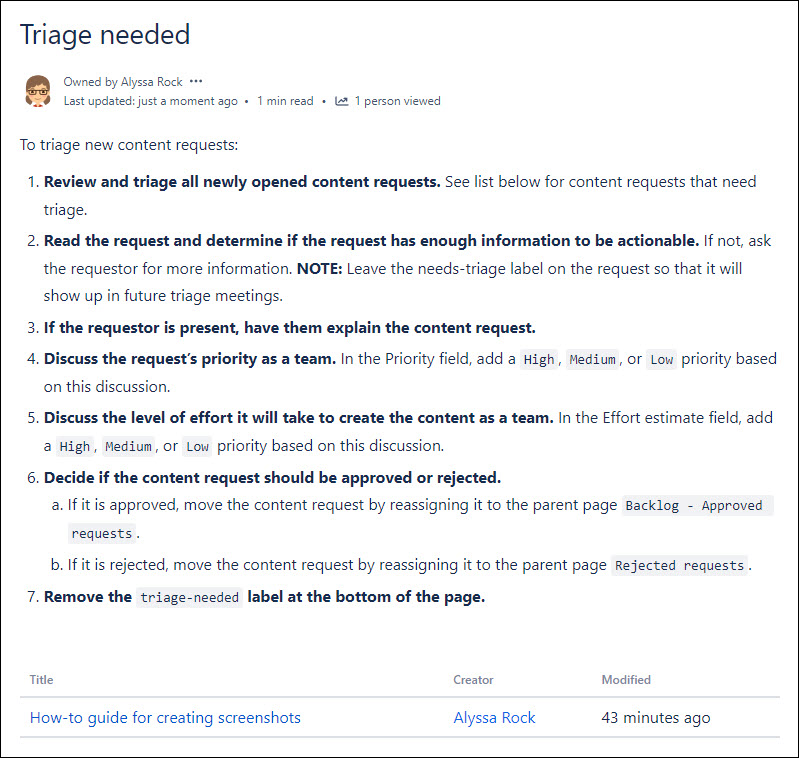
Create the Triage needed page
In this step, you’ll add content to the Triage needed page. This page will explain how to triage new content requests. It will also display all the requests that currently need to be triaged by listing all pages with the triage-needed label.
To create a Triage needed page:
-
Click Triage needed on the side menu to navigate to that page. Edit this page.
-
Add the following content to the page:
-
Press enter to start a new line and ensure your cursor is just below the text you just added.
-
Add the Content report macro:
- Click Insert elements on the edit toolbar to open the macro search. Search for the
Content reportmacro. See Content report macro for more information. - Use these macro settings:
| Setting | Value |
|---|---|
| Labels | Type triage-needed. |
| Space(s) | Select your space name from the menu. |
| Sort by | Page modified |
| Reverse Sort | Leave this box checked. |
| Show comments count | Leave this box unchecked. |
| Show Likes/Reactions count | Leave this box unchecked. |
| Maximum number of pages | Use the default of 20. |
- Optional: Test your template by creating a new content request.
After completing these steps, your Triage needed page will look similar to this example:
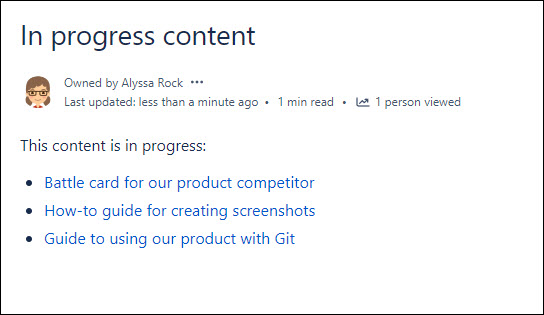
List in progress content and other content stages
Next, you want to add the ability to click on one of your content stage pages and see which content is in each stage of your workflow. To do this, you need to add a macro that will display all the pages that are nested under that stage:
-
Click In progress content on the side menu to navigate to that page. Edit this page.
-
Add the Child pages macro. This macro has no settings that you need to configure. See Insert the child pages macro for more information.
-
Repeat the previous steps to add the Child pages macro to the following pages:
- Backlog - Approved requests
- Completed content
- Reject requests
-
Optional: Test your workflow by moving a content request so that it has a different parent page. Then click that parent page to see a list of the content requests in that stage.
After completing these steps, your In progress page (and other status pages) will look similar to this example:
Use your Confluence space in team meetings
Now that your content workflow is all set up, you’re ready to use your Confluence space to host effective team meetings and move content through your workflow.
To use you Confluence space in team meetings:
-
Open your Confluence space and navigate to The Team > Meetings. Ask someone to record meeting notes. They can click Record meeting notes to start a new set of notes.
-
Navigate to The Team > Actions. Review any open action items listed on this page in this meeting. If a team member has completed an action, check the box next to it.
-
Navigate to The Team > Plan of record > In progress to see the content requests that are currently in progress. Ask each team member to report on status updates for content requests.
-
Move any completed content to the Sell, Deliver, or Adopt sections of the Confluence space so that other people can search for or navigate to the content.
-
Navigate to The Team > Triage needed. Review any new or existing content requests that need to be triaged. Follow the instructions on the page to triage the content requests.
-
Navigate to The Team > Backlog - Approved request. Review the backlog with the team and see if anyone has bandwidth to take on one of the content requests in the backlog.
-
After status updates are complete and new content has been triaged, you can move into the discussion portion of the meeting. Note any decisions or action items in the meeting notes.
Congratulations: you just completed the tutorial. Now go forth and build some great technical content with your team!
Summary
That concludes this tutorial series about using Confluence to set up a space to collaborate and move new content ideas through the content creation workflow to the point where it is ready to be published.
In this tutorial series, you learned how to:
- Start a new Confluence space and add the main pages.
- Add content to the home page.
- Create a meeting notes template.
- Create a meeting page that will automatically list all of the team’s meeting notes created from the meeting notes template.
- Create an actions page that will automatically list any open action items that team’s open action items.
- Add content to the Team and Our Workflow pages.
- Create a content request template.
- Add a new content request button.
- Create the Triage needed page.
- List in progress content and other content statuses.
- Use your Confluence space in team meetings.
Next steps
I hope you enjoyed this tutorial and that your team is able to effectively create new content that will empower your team of technical experts to sell your product, deliver customer solutions, and increase customer adoption.